What is a Gyro Sensor in LEGO® Education SPIKE™ Essential Set?

What is a Gyro Sensor in LEGO® Education SPIKE™ Essential Set?

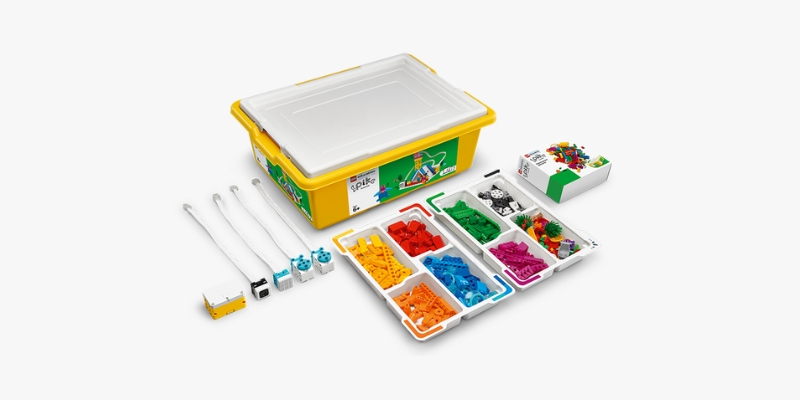
The LEGO® Education SPIKE™ Essential is a favorite among educators for its engaging STEAM (Science, Technology, Engineering, Arts, and Mathematics) activities. One of its most intriguing components is the gyro sensor, a tool that adds depth to students’ understanding of motion, balance, and programming. This blog will guide you through what a gyro sensor is and how to create an exciting program that uses it to control motor movements based on the hub’s orientation.

Understanding the Gyro Sensor

The gyro sensor is a device that detects rotational motion and orientation. Integrated into the LEGO® Education SPIKE™ Essential Hub, it measures the tilt and angle of the hub. This capability allows the hub to interact dynamically with the physical world, enabling students to create responsive and interactive projects. For example, the gyro sensor can detect whether the hub is tilted to the left, right, forward, or backward. This opens up a realm of possibilities for creating motion-based programs.

Getting Started: Materials You Need

To follow along with this activity, you’ll need:

  • LEGO® Education SPIKE™ Essential Set
  • SPIKE™ App (installed on a compatible device)
  • A motor connected to the hub

Once you’ve gathered your materials, connect the hub to the SPIKE app and ensure that it is fully charged.

Step 1: Creating a Program to Turn the Motor When the Hub Tilts Right

Setting Up the Program

  1. Open the SPIKE App: Launch the app and start a new project.
  2. Connect the Hub: Pair your hub with your device using Bluetooth.
  3. Add Blocks for Motor Control:
    • Drag a “When program starts” block into the workspace.
    • Attach a “Forever” loop to ensure continuous monitoring of the hub’s orientation.
  4. Detect Hub Orientation:
    • Inside the loop, use an “If/Else” block to check the gyro sensor’s reading.
    • Add a condition to detect if the hub is tilted to the right.
  5. Control the Motor:
    • If the condition is met (hub tilted right), use a block to turn the motor on.
    • Else, ensure the motor remains off.
  6. End the Program:

Place a “Stop” block to finalize the program.

Testing the Program

Press the play button on the SPIKE App. Tilt the hub to the right and observe the motor turning on. This simple yet effective program introduces students to conditional logic and the interaction between sensors and actuators.

Step 2: Modifying the Program to Respond to Left Tilts

Now that the motor responds to tilting the hub to the right, let’s enhance the program to make the motor turn when the hub tilts to the left.

Adjusting the Code
  1. Duplicate the Initial Setup: Copy the “When program starts” and “Forever” blocks.
  2. Modify the Condition:
    • Replace the right tilt condition with one that detects if the hub is tilted to the left.
  3. Update Motor Behavior:
    • Program the motor to turn on only when the hub tilts left.
    • Add an “Else” statement to ensure the motor stays off when the hub is in any other orientation.
  4. Refine the Logic:
    • Combine both right and left tilt conditions into a single “If/Else If” structure for cleaner code.
Testing Again

Play the modified program and tilt the hub to the left. The motor should now respond accordingly. This demonstrates how students can refine their programs to make them more versatile and responsive.

Benefits of Using the Gyro Sensor in Education

The gyro sensor provides numerous educational benefits, including:

  1. Hands-On Learning: Students learn programming concepts by creating tangible outputs, such as motor movements.
  2. Problem-Solving Skills: Debugging programs and refining conditions enhance critical thinking.
  3. Interdisciplinary Connections: The activity integrates physics concepts like motion and rotation with coding.

Classroom Tips for Teachers

  1. Encourage Exploration: Let students experiment with different angles and motor behaviors using the LEGO® Education SPIKE™ Essential set.
  2. Promote Collaboration: Pair students for peer learning and idea sharing.
  3. Challenge Creativity: Ask students to create additional features, such as using the gyro sensor to control multiple motors or triggering sounds.

The gyro sensor in LEGO® Education SPIKE™ Essential is a powerful tool that bridges the gap between coding and real-world applications. By understanding its capabilities and programming it to interact with a motor, students can unlock their creativity and develop essential STEAM skills. Whether detecting right or left tilts, this activity provides an engaging way to learn about sensors, conditional logic, and robotics. Across schools in Dubai and world over, educators are leveraging the SPIKE App to inspire young minds. Dive into the SPIKE App today and watch your students’ imagination take flight!

Contact us

Fill in your details below or send us an email on info@knowledge-hub.com

VinciBot’s 3-in-1 Smart Sports Kit: The Ultimate Robotic Kits for Education

VinciBot’s 3-in-1 Smart Sports Kit: The Ultimate Robotic Kits for Education

Introducing the 3-in-1 Smart Sports Kit by MatataStudio, the ultimate add-on pack for the VinciBot that combines the thrill of sports with the creativity of coding. Designed to nurture children’s programming skills, logical thinking, and collaborative abilities, this kit opens the door to endless possibilities for hands-on learning and fun. This is the perfect choice for those seeking robotic kits for education that inspire innovation and teamwork. Let’s take a closer look at how this innovative kit works for aspiring young programmers.

The Core Idea Behind the 3-in-1 Smart Sports Kit

The kit introduces an exciting challenge: building and programming a basketball game using robots. With VinciBot and the 3-in-1 Smart Sports Kit, children can create an automatic ball-loading machine and a shooting robot, enabling a seamless integration of robotics, coding, and game mechanics.

  • Building the automatic ball-loading machine – A device programmed to release basketballs.
  • Programming the ball-loading machine – Configured to press a paddle and release a basketball when it receives a signal.
  • Programming the shooting robot – Designed to navigate the basketball field, interact with the ball-loading machine, and return to shoot the ball into the basketball stand.

What’s Inside the 3-in-1 Smart Sports Kit?

This add-on pack includes all the essentials for building an interactive basketball field such as:

  • Basketball Field Map: A pre-designed map that serves as the robot’s playground, fostering spatial awareness and navigation skills.
  • Building Bricks for Basketball (383 pcs): High-quality LEGO®-compatible pieces for creating basketball-related mechanisms and structures.
  • Basketball Stand Popups (x3): Portable stands for setting up the basketball challenge, adding layers of difficulty and fun.
  • Angle Adjustment Bezel (x1): A tool for fine-tuning the basketball hoop’s angle to encourage problem-solving and accuracy.
  • Basketball Props (x6): Mini basketballs used in the gameplay to bring the robotics challenge to life.

With these materials, children can recreate a sports environment and combine it with innovative robotics programming.

The Learning Experience

The 3-in-1 Smart Sports Kit focuses on hands-on, project-based learning, allowing kids to explore:

  1. Programming and Logical Thinking

Children program their robots using VinciBot’s intuitive coding interface. They learn to:

  • Develop if-then logic to send and respond to signals.
  • Create precise motion controls for robots to move between the ball-loading machine and shooting point.
  • Debug their code to ensure smooth operation.
  1. Engineering and Building Skills

Using the kit’s building bricks, kids build functional machines that mimic real-life mechanisms. The automatic ball-loading machine demonstrates concepts like motion mechanics, force application, and cause-effect relationships.

  1. Collaboration and Teamwork

This kit promotes group activities where children divide tasks, brainstorm ideas, and work together to complete the challenge. One child might focus on programming, while another fine-tunes the basketball stand’s angle.

  1. Sportsmanship and Creativity

By simulating a basketball game, the kit introduces the principles of sportsmanship. Kids can adjust rules, add timers, or create scoring systems, making the activity as competitive or cooperative as they like.

How It Works

Here’s a step-by-step guide to using the 3-in-1 Smart Sports Kit:

  1. Assemble the Automatic Ball-Loading Machine: Use the building bricks to construct the machine, ensuring the paddle mechanism is functional.
  2. Program the Ball-Loading Machine: Write a program that activates the paddle when it receives a signal from the shooting robot.
  3. Build and Program the Shooting Robot: Assemble the shooting robot using VinciBot and additional bricks.
    • Program it to:
      • Start at the shooting point.
      • Navigate to the ball-loading machine and send a signal.
      • Pick up the basketball and return to the shooting point.
      • Shoot the ball into the basketball stand.
  4. Test and Refine: Run the program, observe the results, and make adjustments to optimize the robots’ performance.

Why Choose Robotic Kits for Education?

  • Versatile Learning Tool: Whether used at home, in classrooms, or in robotics clubs, the kit caters to various skill levels and learning environments.
  • Engaging and Fun: Kids stay motivated by combining robotics with sports, making learning enjoyable.
  • Encourages Critical Skills: From STEM concepts to teamwork, the activities provide a well-rounded educational experience.
  • Reusable and Durable: The high-quality materials ensure long-term use and adaptability for new challenges.
Real-Life Applications

The 3-in-1 Smart Sports Kit not only introduces coding and robotics but also teaches concepts applicable to real-world scenarios, such as:

  • Automation in Manufacturing: The kit demonstrates automation through its ball-loading mechanism, mimicking real-world manufacturing systems.
  • Navigation Systems in Robotics: Children learn about robotic navigation by programming their robots to move accurately across the basketball field.
  • Problem-Solving Under Constraints: These robotic kits for education encourages critical thinking by challenging users to adjust angles and fine-tune mechanisms for precise shooting.

The VinciBot 3-in-1 Smart Sports Kit transforms learning into an interactive adventure, where programming meets play. By building and programming robots to play basketball, children enhance their problem-solving skills, foster teamwork, and develop a love for STEM, making it one of the most engaging robotic kits for education.

Contact us

Fill in your details below or send us an email on info@knowledge-hub.com

Mastering School Radio Techniques: Your Guide to Professional Broadcasts

Mastering School Radio Techniques: Your Guide to Professional Broadcasts

The School Radio platform is a fantastic tool for students to unleash their creativity, collaborate on projects, and develop valuable technical skills. One of the most exciting aspects of this platform is the ability to create your own radio show segments, which often involves recording, editing, and saving audio. This blog post will equip you with the knowledge and steps to produce professional-quality audio for your broadcasts using school radio techniques.

Getting Started: Recording Basics with School Radio

Most School Radio setups use the MediaWall in Myriad for recording and managing audio files. The MediaWall’s Quick Recorder tool simplifies the process of capturing voices and sounds, making it perfect for crafting engaging radio segments.

The first step to achieving high-quality audio is setting up your microphones and ensuring proper sound levels. Whether you’re a student presenter, a teacher, or a technician, understanding your equipment is key to a smooth recording experience.

Understanding Your Microphone

Most School Radio stations come equipped with one of three mixers:

  • D&R Webstation (6-Channel Mixer)
  • D&R Airlite (8-Channel Mixer)
  • Broadcast Radio SRMv2 (9-Channel Mixer)

While the SRMv2 is most common, the steps to set up microphones and adjust levels are similar across all mixers. Don’t worry if your mixer isn’t listed here, the general principles of school radio techniques will still apply.

Step-by-Step Guide to Setting Microphone Levels

  1. Locate the Microphone Channels: Microphone channels are typically positioned on the left side of the mixer, with each channel corresponding to a specific microphone.
  2. Set the Fader to the Top Position: Each microphone has a dedicated fader. Raise the fader for the microphone you want to use to the highest position.
  3. Speak into the Microphone Correctly: Speaking into the microphone correctly is important for achieving high-quality sound. For horizontal microphones, ensure you speak directly into the end of the microphone, aligning your voice with its pickup direction. In contrast, for vertical microphones, position yourself so that you are speaking into the side with the logo facing you, as this is typically where the microphone captures sound best.
  4. Checking Audio Levels: Audio levels are measured using Peak Program Meters (PPM) or VU meters. On the SRMv2 mixer, you’ll find these meters on the top-right corner. Aim for your audio levels to peak around Level 5 (or 0 on some models), staying just below the red zone. Occasional spikes are okay, but consistently hitting the red zone indicates your audio is too loud. This is one of the most practical tip for achieving professional sound quality in your broadcasts, making it an essential school radio technique.
  5. Adjust Microphone Volume: If the levels are too high or low, use the Trim/Gain knobs on the mixer to adjust microphone sensitivity. Adjust each microphone individually to ensure consistent audio levels among all presenters.

Tips for a Smooth Recording Experience

  • Test Recording: Always do a short test recording to check sound quality and ensure proper microphone levels.
  • Reduce Background Noise: To reduce background noise, record in a quiet setting.
  • Practice Makes Perfect: Encourage presenters to rehearse their scripts beforehand to ensure clear and engaging delivery.
  • Stay Close to the Mic: For optimal sound quality, presenters should speak close to the microphone, but avoid touching it.

Editing and Saving Your Audio Masterpiece

Once your recording is complete, the Quick Recorder tool in Myriad can help you take your audio to the next level. This user-friendly tool is perfect for editing and saving your work, making it an essential part of school radio techniques. You can easily trim audio clips, adjust volume levels, and even add sound effects to enhance the quality of your recordings. Once you’ve perfected your audio, save it directly onto the MediaWall for seamless access during broadcasts.

Why Mastering Audio Matters in School Radio

Learning to manage audio equipment and recording processes equips students with valuable technical skills that are applicable beyond media production. These skills can be beneficial in various areas, such as public speaking, teamwork, and project management. By mastering these steps, students gain the ability to create high-quality, professional radio segments that showcase their creativity and hard work.

The School Radio platform empowers students to explore the exciting world of broadcasting and develop essential communication skills. By understanding the equipment, setting microphone levels correctly, and practicing good recording techniques, students in schools across Dubai and around the world can produce exceptional radio content. Incorporating school radio techniques ensures that both new users and seasoned presenters can hone their technical skills and make the most of their School Radio experience.

Contact us

Fill in your details below or send us an email on info@knowledge-hub.com

Best Practices for Using LEGO® Education Sets in the Classroom

Best Practices for Using LEGO® Education Sets in the Classroom

When you bring hands-on learning into your classroom with LEGO® Education sets like SPIKE™ Prime or BricQ Motion Essential, it’s a chance to unleash creativity, build collaboration, and ignite a love for STEM. But to make it all run smoothly, having clear best practices is key. Let’s explore some simple, teacher-tested strategies that help everyone – from students to parents – get the most out of these innovative LEGO® Education sets.

Classroom Rules: Keeping Creativity Organized

  • Stick to One Set at a Time: Students should use pieces only from their own kit to keep everything neat and avoid missing parts. This way, every team has the tools they need to complete their project without confusion.
  • Use Storage Box Lids as Trays: The lids of the storage boxes are super handy! Use them as trays to work on, show off creations, or move models around safely without dropping pieces.
  • Ask Peers for Help First: If students get stuck, they should ask their teammates for help before asking the teacher. This encourages teamwork and helps them solve problems together, making learning more fun and interactive.
  • Guidelines for Speaking vs. Working: Decide when students should focus quietly on building and when they can talk and share ideas. This keeps everyone on track and prevents the classroom from getting too noisy. Think of it as having “quiet building time” and “idea-sharing time.”

Tidy-Up Time

At the end of each session, reserve time for tidying up. Whether it’s storing completed models or carefully disassembling them, this habit fosters responsibility. Make it a fun challenge – who can finish tidying up the fastest without skipping a step? For example, SPIKE™ Prime kits come with 600 pieces, including large wheels, gear racks, a Color Sensor, and a Large Motor. Place all elements – like wheels, motors, and sensors – back into their designated compartments in the storage box. Use the element overview card as a guide. Handy tip: ensure sensitive parts are handled carefully.

The Lost & Found Jar

A “lost and found” jar is a great way to manage stray LEGO® Education set pieces. Students can place any extra parts they find in the jar, and anyone missing an element can check there first. For example, if a student working with SPIKE™ Prime needs a missing wheel or gear rack, they can quickly look in the jar. Similarly, students using BricQ Motion Essential can find pulleys or levers that might have been misplaced. This system keeps the classroom organized and ensures no one gets stuck because of a missing piece.

Evaluate and Reflect

Take time after each activity to think about what went well and what can be improved. For instance, if students using SPIKE™ Prime had trouble programming their robots or understanding the Color Sensor, you can adjust the instructions for next time. With BricQ Motion Essential, you might notice that students needed more support balancing their models or understanding force and motion. Share your observations with colleagues or explore online communities for fresh ideas. Reflecting regularly helps you create better lessons and keep students excited about learning.

Prepare Students with Tutorials

Before starting larger projects, give students time to try the tutorials in the app’s “Start” section. These activities help them understand how to use the tools and build confidence. For example, SPIKE™ Prime tutorials teach students how to connect the hub or program the Large Motor, while BricQ Motion Essential tutorials show how to assemble basic motion models. Giving students time to practice helps them feel more comfortable and reduces questions during the main activity.

Grouping for Collaborative Learning

Deciding how to group students can make activities more effective. For smaller tasks, like programming SPIKE™ Prime, pair students to ensure focus. For larger builds, such as creating a vehicle with BricQ Motion Essential, groups of three or four work well. Rotating teams gives students the chance to work with different classmates and learn new skills.

Incorporating LEGO® Education sets into your classroom fosters creativity, teamwork, and a love for STEM. By following simple strategies like clear classroom rules and time for tidy-up, you can ensure smooth and engaging learning experiences. Reflecting on each session and organizing materials effectively helps maintain focus and excitement. With thoughtful planning and collaboration, these tools will inspire students and make learning both fun and impactful.

Contact us

Fill in your details below or send us an email on info@knowledge-hub.com

Fun Facts About IoT and How VinciBot Introduces IoT for Students

Fun Facts About IoT and How VinciBot Introduces IoT for Students

The Internet of Things (IoT) is reshaping the way we connect the digital and physical worlds. By enabling seamless communication between devices, IoT allows data to transfer across networks without requiring human intervention. This revolutionary technology has become a cornerstone of digital transformation, influencing industries and everyday life alike. With IoT, the possibilities are endless, creating a smarter, more connected world. Here are some incredible fun facts about IoT for students that showcase its impact and potential.

IoT is Older Than You Think

The concept of IoT dates back to 1982 when a “smart” Coke machine at Carnegie Mellon University could report its inventory and whether drinks were cold.

Billions of Devices

By 2025, over 75 billion devices are expected to be connected to the Internet of Things. That is almost ten times the world’s existing population!

Massive Data Generation

Every year, the world produces roughly 120 zettabytes of data. It’s estimated that IoT devices alone will generate 73.1 zettabytes of data by 2025, which is enough to fill billions of smartphones!

Incredible Connectivity

In 2025, an estimated 152,200 IoT devices will connect to the internet every minute. This rapid growth highlights how integral IoT is becoming to everyday life.

Smart Homes on the Rise

By the end of 2025, 57% of U.S. households are expected to have smart home devices like thermostats, security cameras, and voice assistants.

IoT in Space

IoT isn’t limited to Earth. Satellites and space probes use IoT technology to send data back to scientists, aiding space exploration.

Farming Goes Smart

IoT has revolutionized agriculture with sensors that monitor soil moisture, track livestock, and automate watering systems, boosting efficiency and sustainability.

Saving Lives

IoT-enabled medical devices, such as smart insulin pumps and heart monitors, can track patients’ health in real-time and alert doctors during emergencies.

Smart Factories Mean Big Money

In North America, IoT-powered factories are projected to contribute between $500 billion and $1.5 trillion to the economy in the next five years.

Enormous Investments

Businesses worldwide are expected to invest up to $15 trillion in IoT by 2025, demonstrating its immense value and potential.

IoT Powers Learning

From connected classrooms to smart educational tools, IoT is shaping the future of education, making learning more interactive and engaging. This growing trend highlights the importance of IoT for students, giving them access to innovative tools and real-world applications.

IoT in Sports

IoT is transforming sports by tracking player performance, enhancing training, and improving fan experiences in stadiums.

A Tech-Powered Future

IoT is not just about gadgets; it’s about connecting industries, homes, and even cities for smarter and more efficient living.

Meet VinciBot: Bringing IoT to the Classroom

VinciBot, developed by MatataStudio, is a revolutionary coding robot designed to introduce children to the exciting world of the Internet of Things (IoT). With its hands-on approach and interactive features, VinciBot makes learning about IoT accessible in schools across Dubai and around the world. Here’s how it brings the concept of IoT for students to life:

Connecting to the Digital World

  • Demonstrating Connectivity: VinciBot connects to the internet just like any modern smart device. This feature introduces students to the basic idea of network connectivity, a cornerstone of IoT.
  • Interacting with Other Devices: VinciBot can communicate with other devices, forming a mini-ecosystem of interconnected gadgets. This setup helps children visualize how IoT devices collaborate to create smarter environments.

Introducing Tiny Machine Learning (Tiny ML)

  • Learning and Adapting: VinciBot incorporates Tiny ML technology, allowing it to process data, recognize patterns, and make intelligent responses. This offers a hands-on introduction to machine learning, a critical component of IoT.
  • Practical Demonstrations: As students program VinciBot to adapt its behavior based on input data, they gain insights into how IoT systems use data analysis to optimize functionality in real-life applications.

Real-World IoT Applications

  • Building Environmental Monitors: Students can program VinciBot to track conditions such as temperature and humidity, simulating how IoT sensors are used in smart homes and environmental monitoring.
  • Creating Automation Systems: VinciBot enables children to build basic automation projects, such as turning lights on and off or triggering specific actions based on sensor inputs. This highlights IoT’s role in enhancing efficiency and automation.

VinciBot is more than a coding robot—it’s a gateway to understanding IoT for students and developing essential 21st-century skills.

Contact us

Fill in your details below or send us an email on info@knowledge-hub.com