Unlock Creativity with the VinciBot Creator Kit

Unlock Creativity with the VinciBot Creator Kit

The VinciBot Creator Kit by MatataStudio is a game-changer for educational robotics. This expansion pack, designed to work seamlessly with the VinciBot platform, empowers students to become creative engineers and inventors. Get ready to explore complex mechanical concepts through hands-on projects. Designed for ages 8 and up, this tool is an invaluable asset in schools and is preferred by educators to make learning more engaging, interactive, and effective. Let’s delve into what makes the Creator Kit an invaluable resource for students and educators alike.

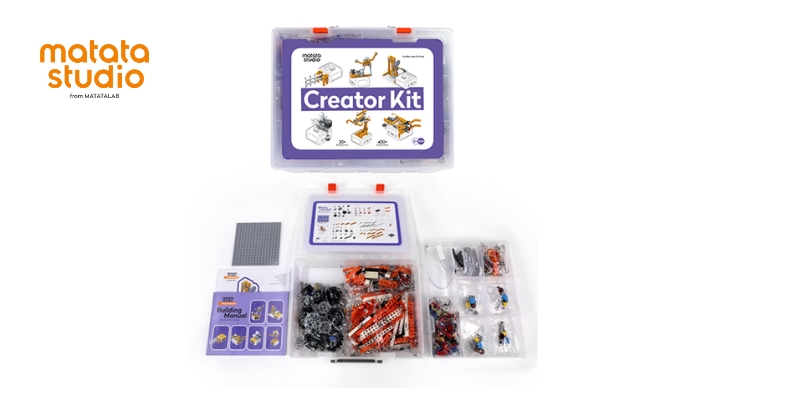
What is the VinciBot Creator Kit?

The Creator Kit is an expansion pack specifically designed for VinciBot, adding over 400 building blocks and an external motor to its repertoire. These components enable students to construct and build a variety of structures, each showcasing different physical mechanisms. By combining VinciBot’s advanced programming capabilities with creative building, the Creator Kit bridges the gap between theoretical concepts and practical application, making STEM education both engaging and effective.

Exploring Physical Mechanisms

One of the Creator Kit’s standout features is its ability to demonstrate fundamental mechanical principles. Here are a few key mechanisms students can explore:

  • Crankshafts: The VinciBot Creator Kit provides the necessary components for constructing crankshafts, allowing students to see firsthand how rotational motion can be converted into linear motion. For example, students can assemble a simple crankshaft mechanism connected to the external motor included in the kit. By powering the motor, they can observe how a rotary input (the motor’s spinning shaft) translates into linear movement in a connected component, such as a slider. This principle, commonly found in car engines and even water pumps, becomes more intuitive when students physically create and manipulate the mechanism.
  • Linkages: By combining the linkage system with VinciBot’s programming capabilities, they can design automated systems, such as a mechanical arm that moves objects from one point to another. This hands-on experience helps students grasp how linkages work to amplify or redirect motion and force. It also fosters problem-solving as they learn to adjust the lengths and angles of the components for optimal functionality.
  • Cam Structures: The cam structures in the Creator Kit provide a hands-on way to explore the conversion of rotary motion into reciprocating motion. Students can build a camshaft that rotates to push an object up and down, demonstrating how cams are used in automated systems like conveyor belts, textile machinery, or even music boxes.

Building and Programming in Harmony

The kit goes beyond simple construction. Its seamless integration with VinciBot’s programming environment enables students to design dynamic forms and behaviors.

  • Creativity: Encouraging students to think outside the box and design unique projects.
  • Engineering Thinking: Teaching problem-solving skills and the iterative design process.
  • Design Mindset: Cultivating an appreciation for aesthetics and functionality in engineering solutions.

Featured Projects

The VinciBot Creator Kit supports a wide range of projects that challenge and inspire students. Here are a few exciting examples:

  • Gyroscope Transmitter: This project demonstrates balance and stabilization, teaching students about angular momentum and its applications in technology like drones and smartphones.
  • Big Pendulum Ride: Mimicking a real-world amusement park ride, this structure introduces concepts like periodic motion and energy transfer.
  • Mechanical Claw: The VinciBot Creator Kit lets students build a working robotic claw, helping them learn how gripping mechanisms work. They can see how motorized parts open and close the claw to pick up objects. This hands-on activity makes it easy to understand how robots grip and move things.
  • Induction Door: Students can build an automated door that uses sensors to detect movement and open or close on its own. This project helps them learn how sensors and mechanical systems work together, just like the automatic doors in malls or smart buildings.

Each project is designed to be engaging, challenging, and educational, making learning both fun and impactful.

Benefits of the Creator Kit

This platform offers numerous advantages for students and educators, including:

  • Hands-On Learning: Students learn by doing, which enhances retention and understanding.
  • Cross-Disciplinary Skills: The kit integrates concepts from physics, engineering, and computer science.
  • Teamwork and Collaboration: Group projects foster communication and cooperative problem-solving.
  • Preparation for Future Careers: Skills like coding, mechanical design, and creative thinking are invaluable in the modern workforce.
Why Educators Love the Creator Kit

For educators, it is a versatile tool that supports curriculum objectives while keeping students engaged. The kit’s modular design allows it to be used in various educational settings, from classroom lessons to after-school clubs and competitions. Its alignment with STEAM (Science, Technology, Engineering, Arts, and Mathematics) goals ensures that students develop a well-rounded skill set.

The VinciBot Creator Kit is more than an educational tool; it’s an invitation to innovate. By combining creative building with programmable technology, the kit empowers students to explore, experiment, and excel. Whether constructing a gyroscope transmitter or designing a mechanical claw, students gain practical skills and confidence in their ability to solve complex problems.

Contact us

Fill in your details below or send us an email on info@knowledge-hub.com

How To Predict Weather Patterns Using The LEGO® Education SPIKE™ Prime Set

How To Predict Weather Patterns Using The LEGO® Education SPIKE™ Prime Set

Imagine a classroom where students aren’t just passively listening to lectures; they’re actively building, coding, and predicting the weather! Yes, you read that right—students are actually predicting weather patterns using their coding skills. Introducing the LEGO® Education SPIKE™ Prime “Rain or Shine” lesson: a thrilling adventure that turns weather forecasting into a hands-on, interactive experience for middle schoolers (Grades 6–8). This innovative lesson merges STEM learning with real-world applications, empowering students to become creative thinkers and tech-savvy problem-solvers!

Step-by-Step Weather Forecasting Adventure

1. Ignite Curiosity (5 Minutes)

Begin by engaging students in a lively discussion about the importance of weather forecasts in daily life. Use relatable examples, such as how sunny skies influence planning a picnic or how a rainy days dictate what to wear. This conversation helps students connect weather patterns to real-world decisions, fostering an appreciation for the value of understanding and predicting the weather.

2. Build the Weathercaster (25 Minutes)

Students should work in pairs to assemble their weathercaster models using LEGO® Education SPIKE™ Prime sets. Guide them to position the motors at the zero point, with the arms fully lowered. This setup ensures the weathercaster operates smoothly and accurately. By combining motors, sensors, and LEGO bricks, students bring their weathercaster models to life.

3. Code the Forecast

Participants will use the SPIKE App to fetch real-time weather data using the “Weather” block. They will choose a specific city or location to see its forecast (ex: let’s see the weather in Paris, France). Once the weather data is available, students experiment with it, using coding blocks to not only display the current weather but also predict conditions for the next few hours.

Now, using the “IF ELSE” statements, they will program the SPIKE Prime model to recognize different weather conditions like sunny, cloudy, rainy, snowy, or foggy.

Lastly, the model can be programmed to trigger different animated visuals based on the weather forecast. For example: if the forecast is “Sunny,” the model might display a sun icon / if it’s “Rainy,” the model might showcase an animated rain cloud.

4. Test and Refine

Students test their weathercasters by inputting data for various locations and comparing predictions to actual conditions. They analyze discrepancies, identify errors, and make adjustments to improve their models. This iterative process builds critical thinking and problem-solving skills.

What Students Will Learn

1. Cloud Data and Real-Time Updates

While students explore cloud data by accessing live weather forecasts through the LEGO® Education SPIKE™ Prime App, they get up-to-date information and experiment with it using coding blocks. This teaches the class to predict weather patterns and link real-time data to their programming.

2. Coding Logic with Conditional Statements

When students use “IF ELSE” statements to program their weathercasters to respond to different weather conditions, they are essentially mastering logical thinking. Conditional logic is when decisions are made based on the weather data. By programming these actions, students learn how to create dynamic, data-driven outputs. This activity helps build a strong foundation in programming through logic-based decision-making.

3. Problem-Solving and Collaboration

Students work in pairs to build and improve their weathercaster models, testing their code with different weather data. They analyze discrepancies between predicted and actual conditions, identifying errors or flaws in their programs. Collaboration is key as students share ideas and help each other troubleshoot issues. By refining their models together, students learn to work collaboratively while honing their coding skills.

Going Beyond: Extensions and Differentiation

Language Arts Integration:

Have students play the role of TV weather presenters. They can create scripts, practice public speaking, and present their forecasts using their LEGO models.

Math Integration:

Challenge students to calculate the accuracy of their forecasts by comparing predictions to actual outcomes and computing percentages.

Career Connections

This lesson introduces students to careers in STEM fields, such as meteorology, software engineering, and data analysis. By combining technical skills with creativity, it fosters an early interest in problem-solving professions.

Why “Rain or Shine” Is a Game-Changer

  • Hands-On Learning: The lesson bridges the gap between abstract coding concepts and tangible outcomes.
  • Real-World Relevance: Students see the practical applications of cloud data and programming in everyday life.
  • Collaborative Approach: Pair work promotes teamwork and communication skills.
  • STEAM Focus: By integrating science, technology, engineering, arts, and math, this lesson provides a holistic learning experience.

The LEGO® Education SPIKE™ Prime “Rain or Shine” lesson is an excellent way to make coding and data analysis exciting for middle school students. It not only enhances technical skills but also sparks creativity and curiosity about the world around them.

Contact us

Fill in your details below or send us an email on info@knowledge-hub.com

AutoAuto’s Virtual Python Programming Courses and AI Lessons: A Must-Have in Schools

AutoAuto’s Virtual Python Programming Courses and AI Lessons: A Must-Have in Schools

As technology evolves, schools are under increasing pressure to equip students with future-ready skills. AutoAuto’s virtual course on Python programming and Artificial Intelligence (AI) is an innovative solution that bridges this gap. This fully virtual program empowers students to master coding and explore AI concepts through hands-on, project-based learning—all without needing physical equipment. Virtual Python programming courses like this one are transforming education by making advanced skills accessible to all students. Let’s explore how it works and why it’s a game-changer for educational institutions.

How Does the Virtual Course Work?

Interactive Learning Platform
The virtual course operates entirely through an intuitive, web-based platform. Students can access their personalized learning environment from any internet-connected device, such as Chromebooks or iPads, eliminating the need for software installations or complex setups.

Virtual AutoAuto Cars
Virtual Python programming courses like AutoAuto offer simulated AutoAuto cars instead of physical ones. These virtual cars replicate real-world autonomous vehicle functions, allowing students to write and test Python code in a safe, controlled digital environment. Each student gets their own virtual car, encouraging independence and hands-on experimentation.

Project-Based Lessons
The curriculum is designed around real-world applications of AI and autonomous vehicles. Through step-by-step, project-based lessons, students not only learn to code in Python but also grasp AI concepts such as decision-making, object detection, and path optimization.

Grade-Level Flexibility
The virtual course is tailored for students from 3rd grade through college. The content adapts to the learner’s age and skill level, ensuring an engaging experience for beginners and advanced coders alike.

Why AutoAuto’s Virtual Course is Apt for Schools

Accessible and Cost-Effective
The virtual nature of this course eliminates the need for expensive physical hardware. Schools can implement the program with minimal investment, making it an attractive option for budget-conscious institutions. Plus, the web-based setup means no logistical challenges like storage or maintenance.

Prepares Students for High-Demand Careers
Virtual Python programming courses like AutoAuto equip students with Python programming and AI skills, which are among the most sought-after in today’s job market. By introducing these concepts early, AutoAuto equips students with a strong foundation for future careers in technology, engineering, and data science.

Promotes Critical Thinking and Problem-Solving
The hands-on projects challenge students to think critically, debug code, and solve complex problems. These skills are invaluable, not just in STEM fields but in any discipline requiring analytical thinking.

Engaging and Fun
The gamified approach of coding a virtual car makes learning enjoyable. Students stay motivated as they see their code come to life through simulated autonomous car movements, creating a sense of accomplishment and excitement.

Teacher-Friendly Features
Virtual Python programming courses like AutoAuto include a teacher’s portal, making it easy to track student progress, grade assignments, and manage cohorts. The platform also provides free professional development sessions and onboarding training, helping educators feel confident implementing the course.

Global Reach and Multilingual Support
The curriculum is available in English, Spanish, and Portuguese, making it accessible to diverse student populations. Schools worldwide, including IB schools in Dubai, can benefit from access to cutting-edge content.

Success in Every Classroom

AutoAuto’s virtual course seamlessly integrates into existing school curricula. It’s flexible and scalable, ideal for diverse learning environments, especially STEM-focused schools. Beyond textbooks, it brings AI to life virtually, sparking excitement and healthy competition. Students build impressive projects, explore AI applications, and gain early exposure to a potential tech career. This prepares them for college-level AI and empowers them to become future innovators. These students are poised to become leaders in the field of AI, taking on roles such as:

  • AI Engineers: Designing, developing, and implementing AI algorithms for various applications.

  • Data Scientists: Analyzing large datasets to extract meaningful insights and build predictive models.

  • Machine Learning Engineers: Developing and deploying machine learning models for real-world problems.

  • AI Researchers: Pushing the boundaries of AI by conducting cutting-edge research and developing new algorithms.

  • AI Ethics Specialists: Ensuring the responsible and ethical development and deployment of AI systems.

Contact us

Fill in your details below or send us an email on info@knowledge-hub.com

Useful Physics Lessons for Kids with the LEGO® BricQ Motion Kit

Useful Physics Lessons for Kids with the LEGO® BricQ Motion Kit

The holiday season is a perfect time to sprinkle some festive cheer into learning! Why not transform your classroom into a winter science wonderland to explore physics lessons for kids and learn about fundamental concepts through engaging hands-on activities? Instead of just reading about forces and motion, let them experience these ideas by designing their own miniature sleds and icy tracks. This creative project combines the magic of the holidays with the excitement of STEM learning.

What is Bobsledding?

Bobsledding is a thrilling winter sport. Teams race down an icy track in a small, aerodynamic sled. They use gravity and momentum to gain speed, while skillful steering helps them navigate the twists and turns of the track to achieve the fastest times.

The Science Behind Bobsledding

Watching a bobsled race down an icy track can leave you wondering, “How does it move so fast?” The answer lies in the interplay of forces:

  • Gravity: This natural force pulls the bobsled downhill, giving it the initial push needed to start moving.
  • Momentum: A bobsled’s speed increases with its mass. More mass means more momentum, which helps the sled maintain motion and travel farther.
  • Friction: This force resists motion. The smoother the bobsled and track surface, the less friction there is, allowing the sled to glide faster.

Hands-On Learning: Build Your Own Bobsled and Ice Track

Why just watch when you can create your own bobsled adventure? Here’s how to get started:

  1. Build Your Track and Sled: Use LEGO® Education BricQ Motion kit and follow step-by-step instructions to get started.
  2. Experiment with Weights: Add or remove weight from your bobsled to see how it affects speed and distance.
  3. Measure Your Results: Use a yardstick or measuring tape to track how far the bobsled travels. Record your results to compare different setups.

Make Predictions: Before testing, predict which configuration will perform best. Hypothesizing and analyzing results is a great way to practice scientific thinking

Learning Through Experimentation

This activity is packed with learning opportunities:

  • Understanding Forces: When kids release the bobsled on a steep track, gravity pulls it downward, causing the sled to accelerate. As the sled gains speed, it also gains momentum, allowing it to continue moving even after the initial push. Through hands-on experimentation, kids will see how a smooth track allows the sled to travel faster due to less friction, while a rough track causes the sled to slow down. This real-life example brings the concept of friction to life, helping kids understand how it impacts motion—an essential aspect of physics lessons for kids.
  • Exploring Variables: By adding weight to the bobsled, kids will observe that the sled moves faster and farther on a smooth track due to the increased mass, which gives it more momentum. Reducing the weight of the sled, on the other hand, will result in slower movement, demonstrating the relationship between mass and speed. Additionally, experimenting with different track surfaces—rough versus smooth—lets kids see how variables like weight and surface conditions affect the outcome. This hands-on experiment is an excellent example of physics lessons for kids, showing how small changes can make a big difference in motion.
  • Making Predictions: Before testing the bobsled on different tracks, kids may predict which setup will work best. After testing, they can compare their predictions with the results, which helps them develop a better understanding of how the variables affect the sled’s performance.

Easy-to-Understand Science

Bobsledding might seem complex, but the science is straightforward. Here’s a simple explanation for young learners:

  • Gravity: Gravity is the force that pulls objects toward the center of the Earth. It’s what makes things fall and what causes the bobsled to accelerate downhill as it moves along the track, illustrating how gravity works in real life—an essential topic in physics lessons for kids.
  • Momentum: Momentum is the tendency of an object to keep moving once it’s in motion. The bobsled, once it starts moving, continues to move faster and farther because of its momentum, a key principle in physics lessons for kids.
  • Friction: Friction is the force that resists motion when two surfaces rub against each other. In the case of the bobsled, a rough track increases friction, slowing it down, while a smoother track reduces friction, allowing the sled to glide faster—helping kids understand how friction affects movement in physics lessons for kids.

So are you ready to spark curiosity and fun this holiday season with bobsledding-inspired activities?

Contact us

Fill in your details below or send us an email on info@knowledge-hub.com

Introducing Loops in Programming to Beginners

Introducing Loops in Programming to Beginners

What is a Loop in Coding?

In coding, a loop is a technique used to repeat a set of instructions or actions multiple times without the need to write them over and over again. This approach helps save time and effort, making loops in programming a handy tool for developers.

Structure of Loops

The structure of a loop can be divided into two main parts: the control statement and the body of the loop.

What is meant by a Control Statement?

A control statement defines the conditions under which a loop continues to execute. It ensures that the loop follows a structured flow, enabling repetitive tasks to run seamlessly until a specific condition is met. It includes; initialization, condition, and increment/decrement. 

  • Initialization: This is where the loop starts. You set a starting value for the variable. For example, when working with loops in programming to print numbers from 1 to 10, you start by setting the variable i to 1 (e.g., i = 1 # Initialize the loop variable).
  • Condition: Before each round of the loop, a check is done to decide if the loop should keep going. The loop continues as long as this check is true. For example, to print numbers, the condition might be i <= 10, meaning the loop will keep running until i is greater than 10. (Eg: while i <= 10: # Check if i is less than or equal to 10 print(i) # Loop body)
  • Increment/Decrement: After each round, you update the loop variable to move closer to the end. For example, after printing a number, you add 1 to i to move to the next step. (Eg: i += 1 # Increment i by 1 after each loop iteration).

What is meant by Loop Body?

The loop body is the part of the loop that runs again and again. It’s where the main task happens. For example, if you want to print numbers from 1 to 10, the loop body is the code that prints the current number (i)

(Eg: print(i) # This is the loop body, it prints the value of i). This part repeats for each step of the loop until the condition is no longer true.

Advantages of Loops

Loops are a key feature in programming languages like C, Java, Python, and JavaScript. They help streamline repetitive tasks by executing the same block of code multiple times, making loops in programming essential for creating efficient and reusable code, especially for beginners.

  • Save Time: Loops reduce the need to write repetitive code manually.
  • Improve Readability and Efficiency: They make the code cleaner and more organized.
  • Enable Flexibility: Loops allow programs to handle dynamic scenarios and adjust to changing conditions.
  • Handle Large Data: They efficiently process large datasets with minimal effort.
  • Simplify Maintenance: Debugging and updating code becomes easier when loops are used correctly.

Types of Loops

  • For Loop: Repeats a block of code a specific number of times.
  • While Loop: Executes a block of code as long as the condition is true.
  • Do-While Loop: Executes the code at least once before checking the condition.
  • Infinite Loop: Runs indefinitely unless manually stopped.
  • Nested Loops: Loops within loops for multi-level iterations.
  • Recursive Loop: Repetition achieved through recursive function calls.
  • Parallel Loops: Executes multiple loop iterations simultaneously for efficiency.

Learning Loops in Kindergarten

Even preschoolers can understand the concept of loops if taught in a simple and engaging way. You can explain loops as repeating a set of actions until a goal is achieved. For instance, if a child is stacking blocks, they repeat the action of adding a block until the tower reaches a certain height.

Follow this explanation with an activity in class to reinforce the concept. For example: Ask children to clap their hands five times. Now, use a fun song with repeated actions, like hopping or spinning, to demonstrate loops in real life.

Activities with the MatataStudio Coding Set

The MatataBot robot which comes along with the MatataStudio Coding Set is an excellent tool for teaching loops through hands-on activities. It’s a screen-free coding robot designed for young learners of ages 4 to 9 years. Here’s an example activity to teach loops using the kit:

  • Setup: Place MatataBot on a play mat with a defined path that repeats (e.g., a square or circle).
  • Introduce the Challenge: Explain that MatataBot needs to move around the path multiple times.
  • Use Loop Commands: Show children how to use the loop tiles to repeat the same sequence of movements.
  • Run and Observe: Let the robot execute the loop. This gives immediate feedback, helping children see how loops work in action.
  • Debugging and Adjustment: If the robot doesn’t complete the task correctly, encourage children to adjust their sequence, fostering problem-solving skills.

Teaching loops early, through tools like MatataBot, helps develop logical thinking and problem-solving skills for future programming success.

Contact us

Fill in your details below or send us an email on info@knowledge-hub.com