
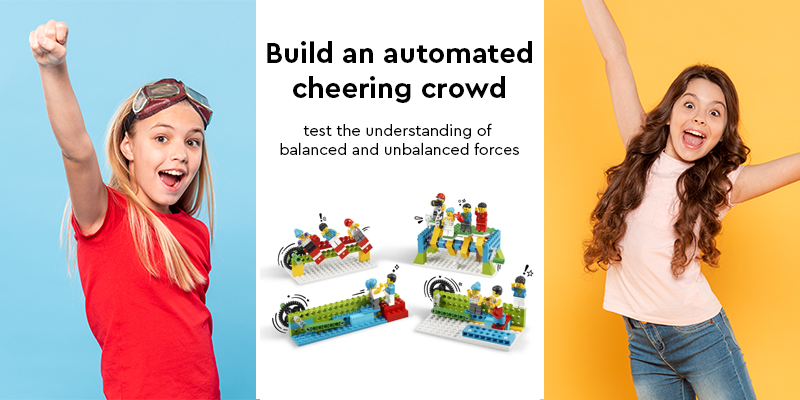
The checkered flag is about to wave, the crowd is roaring, and the excitement is electric! In this thrilling LEGO® Education BricQ Motion Essential lesson plan, we’ll take you through the final leg of the engineering design process. Get ready to put your knowledge of forces and motion to the test as you build an automated cheering crowd using LEGO® bricks! Easy force experiments are designed for students in grades 3-5 and can be completed in two class sessions (around 45 minutes each) in a hybrid learning environment. It’s perfect for those who have already explored simple mechanisms, patterns in motion, and balanced and unbalanced forces in previous lessons.
Building a Cheering Crowd
Part A: Setting the Stage (45 Minutes)
Warm Up! (5 Minutes)
- Let’s get inspired! Begin by watching a short video (included in the student material) that captures the energy of a crowd celebrating a victory to get started with the easy force experiments.
- After the video, have a quick discussion with your classmates. Ask questions like:
-
- How were the people moving in the video? (Jumping, waving, high-fiving!)
- Can you connect these movements to the mechanisms we’ve learned about?
- How can we use what we know about forces and motion to create LEGO® models that mimic these actions?
Get Ready to Cheer! (Announce the Challenge! – 5 Minutes)
- It’s time to unleash your inner engineer! Today’s mission: design and build a mechanism (or multiple mechanisms) that creates an automated cheering crowd.
Planning Makes Perfect! (30 Minutes)
- Now comes the brainstorming and building phase!
-
- Sketch your ideas to brainstorm on easy force experiments! Before diving into construction, take some time to plan your masterpiece. Draw out your design and think about how the different parts will connect and move.
- Build it! Feel free to use your creations from previous lessons for inspiration, or unleash your creativity and invent something entirely new.
- The more interconnected moving parts, the better! Encourage complexity in your designs.
- Teamwork makes the dream work! Discuss your ideas with your classmates before building.
Part B: Refining and Celebrating (45 Minutes)
Sharing is Caring! (5 Minutes)
- It’s time to showcase your creations! Gather your classmates and share your plans for refining, improving, and finalizing your cheering crowd models.
- Feeling stuck? No problem! Brainstorm solutions together. Here are some ideas:
-
- Use the building instructions for inspiration.
Bringing Your Cheer Squad to Life! (30 Minutes)
- Time to put the finishing touches to the models created using easy force experiments
-
- You’ll have 20 minutes to complete your creation. After 15 minutes, a friendly reminder will let you know you have 5 minutes left to ensure a functional model.
- Once your model is built, test it with a partner for 2 minutes. Did it bring the crowd to life?
- Early finishers? Put your creativity to use by marking a start and finish line (50 inches apart) for a celebratory Minifigure race!
- Now comes the grand finale! Gather everyone for a class-wide celebration!
Reflecting on the Race (5 Minutes)
- Let’s talk about your awesome creations! Explain your models to your classmates.
- Ask questions like:
-
- How well did your model work?
- What improvements could you make for next time?
Beyond the Finish Line (5 Minutes)
- Let’s wrap up with a final reflection.
-
- What part of this lesson did you enjoy most?
- What was the most challenging aspect?
- Were there any models that particularly inspired you?
Cleaning Up and Assessment
- Time to put everything back in order! Dismantle your models, sort the LEGO® bricks back into their trays, and tidy up your workspace.
- Throughout the lesson, remember to ask guiding questions that encourage your students to “think aloud” and explain their thought processes when making building decisions.
How Did We Do?
There are several ways to assess your students’ understanding:
- Observation Checklist: Keep an eye on how well your students can explain the forces at play in their models.
- Self-Assessment: Have each student choose a LEGO® brick that reflects their performance:
-
- Green: I can kind of explain the forces in my model.


Recent Comments