How To Ignite Curiosity with the LEGO® Education SPIKE™ Essential Set

How To Ignite Curiosity with the LEGO® Education SPIKE™ Essential Set

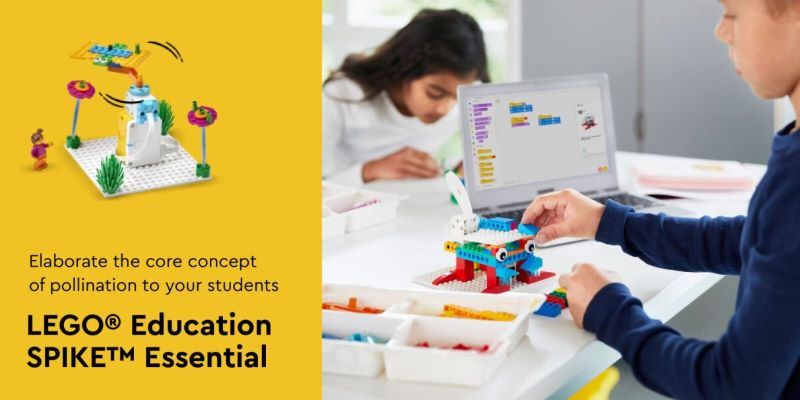
The natural world is filled with fascinating processes, and pollination is no exception. This vital act ensures the continuation of plant life, and LEGO® Education SPIKE™ Essential offers a delightful way for grade 2 students to explore it. This blog delves into the “Pollination” lesson plan, showcasing how it ignites young minds’ curiosity about the wonders of plant reproduction.

Planting the Seeds of Learning

The LEGO® Education SPIKE™ Essential lesson plan cleverly introduces the concept of pollination through the story of Maria, a curious child who observes bees visiting her apple tree. Sparked by Maria’s wonder, students embark on a journey to understand the role of these buzzing visitors.

Part A: A Bee’s Busy Day

The first part of the LEGO® Education SPIKE™ Essential lesson focuses on the core concept of pollination. Through a captivating blend of discussion and hands-on activities, students delve into the following:

  • The Importance of Pollen Exchange: Students gain a fundamental understanding that plants require pollen transfer from one flower to another for seed production.
  • Animal Aides: The lesson explores the crucial role of animals like bees, butterflies, and birds in facilitating pollination. Students learn how these creatures, attracted by a flower’s nectar, inadvertently pick up pollen and transport it to new flowers, enabling fertilization.
  • Building and Programming: Armed with newfound knowledge, students get creative! Each group receives a LEGO® SPIKE™ Essential set and embarks on building a model that depicts the pollination process. The intuitive SPIKE™ App guides them through the process, providing clear instructions and coding blocks. Students are encouraged to showcase their unique interpretations of how animals move pollen between flowers.

Sharing and Reflecting

After a dedicated building and programming with the LEGO® Education SPIKE™ Essential set, students come together to share their creations. This collaborative exchange allows them to:

  • Explain their models: Each group demonstrates their creation, explaining how it represents animal-assisted pollen transfer and highlighting the crucial parts of a flower involved in the process.
  • Reinforce understanding: Through guided questions and discussions, students solidify their grasp of pollination, emphasizing the vital role animals play in ensuring healthy plant reproduction.

Learning from peers: Sharing their creations fosters a collaborative learning environment where students gain insights from each other’s models and approaches.

Part B: Expanding Horizons (Optional)

The lesson plan offers an optional Part B, perfect for extending the learning experience and igniting further curiosity. Here, students delve into the fascinating world of seed dispersal:

  • Beyond Pollination: Students explore the journey after pollination, learning how fertilized flowers develop into fruits containing seeds.
  • Nature’s Diverse Delivery Methods: The lesson sheds light on the various ways seeds travel to new locations, including being carried by animals, wind, or water.
  • Building and Programming for Seed Dispersal: Students leverage their existing models and newfound knowledge to modify them. The challenge? To showcase how animals can help disperse seeds, showcasing the remarkable diversity of nature’s mechanisms.

Assessment and Differentiation

The lesson plan incorporates a variety of assessment methods to gauge student understanding:

  • Observation Checklist: Teachers can observe students’ building, programming, and explanation skills to assess their grasp of the concepts.
  • Self-Assessment: Students reflect on their learning experience by selecting a colored brick that best represents their perceived level of mastery.
  • Peer-Feedback: Students engage in constructive discussions with their peers, offering encouragement and sharing valuable insights.

The LEGO® Education SPIKE™ Essential lesson plan also acknowledges the importance of differentiation, providing suggestions for both simplifying and enhancing the experience to cater to diverse learning styles and paces.

The “Pollination” lesson plan effectively demonstrates the power of blended learning. By combining the timeless appeal of LEGO® bricks with user-friendly coding tools, it fosters a dynamic learning environment. Students actively engage in building, programming, discussion, and reflection, solidifying their understanding of a critical natural process in a fun and engaging way. This lesson plan is just one example of how LEGO® Education SPIKE™ Essential empowers young learners to explore the wonders of science and technology

Contact us

Fill in your details below or send us an email on info@knowledge-hub.com

A Guide to Choosing Helpful Woodworking Tools for Kids

A Guide to Choosing Helpful Woodworking Tools for Kids

Introducing children to woodworking can be a highly rewarding experience that teaches them creativity, patience, and practical skills. However, selecting the right woodworking tools for kids and ensuring their safe introduction to the craft requires careful consideration. This guide will provide insights into the essential woodworking tools for kids suitable for specific age groups.

Choosing the Right Woodworking Tools for Kids

Selecting the appropriate woodworking tools is crucial for ensuring safety and facilitating a positive experience. Here’s a list of recommended woodworking tools for kids, categorized by age group:

Ages 4-6:

  1. Wooden Mallet: It is lightweight and easy to handle, suitable for simple projects. The wooden mallet can help children understand the basics of force and impact. It’s great for use with wooden pegs and small dowels.
  2. Kid-Sized Hammer: Choose a small and light hammer with safe edges. It is specially designed for tiny hands. Its ergonomic handle ensures a secure grip, preventing slips and mishaps. Perfect for allowing kids to hammer nails into soft wood.
  3. Safety Scissors: These are ideal for cutting paper and soft materials. They help in developing hand-eye coordination and precision cutting skills.
  4. Sandpaper: For smoothing edges and surfaces, introduce kids to the concept of finishing. Fine-grit sandpaper teaches them the importance of smoothing rough surfaces for better results.
  5. Wood Glue: Use non-toxic glue for joining pieces of wood. Encourage kids to understand the basics of adhesive bonding and structural integrity.
Unimat_blog

Ages 7-9:

  1. Hand Saw: This is a small, fine-toothed saw for cutting thin wood pieces. Ensure it has a blade guard. It helps children learn about straight and curved cuts. In addition to the basic hand saw, introduce names of specialized saws like the pull saw, coping saw, and back saw for added knowledge and vocabulary.
  2. Measuring Tape and Ruler: Measuring tape and rulers are like the roadmap for woodworking! They help kids understand how big things are (dimensions) and how to cut pieces exactly the right size. This accuracy is key to making their projects fit together perfectly.
  3. Clamps: Tiny clamps help hold pieces together securely while gluing or nailing. Clamps teach the importance of stability during assembly. They also help in developing the skill of positioning and securing workpieces.
  4. Nail Set: Use nails that have blunted tips compared to a standard set. Teach students the technique of driving nails slightly below the wood surface to join pieces of wood together.

Ages 10 and Up:

  1. Chisels: Child-friendly chisels have rounded tips. They are perfect for adding intricate details to wooden pieces. For example; one can use the chisel to design decorative patterns on a miniature jewel box.
  2. Cordless Drill: The drill should be lightweight with adjustable speeds for children to handle it. Plus, it doesn’t have a cord and thus there is no chance of tripping over it. Kids can drill pilot holes or drive screws with confidence using the drill.
  3. Sanding Block: The sanding block provides a safer and more controlled way for young woodworkers to smooth their projects. Unlike loose sandpaper which can be tricky to hold, the sanding block has a handle for better grip.
Unimat ML Design & Technology 1
the cool tool education

What are Woodworking Kits?  

Cool Tool Education’s innovative Woodworking Kit is the perfect introduction to the world of technical education! This kit provides everything students need to explore sawing, wood turning, drilling, sanding, and more – all in a safe and engaging way. The handy storage box ensures that all the tools are kept organized and readily available for their next creative adventure.

Introducing woodworking tools to kids will boost their confidence, as it fosters a deeper appreciation for craftsmanship. Vocational training in schools across Dubai and other regions is gaining popularity as educators recognize the value of hands-on learning experiences. So, get ready to equip young learners and watch them thrive in the fascinating world of woodworking.

Contact us

Fill in your details below or send us an email on info@knowledge-hub.com

Building Valuable Social Skills with Robotics Kits for Students

Building Valuable Social Skills with Robotics Kits for Students

In today’s digital age, developing social skills is just as crucial as academic achievements. For students in K-12 schools, robotics kits for students offer an innovative way to enhance these skills while fostering an interest in STEM (Science, Technology, Engineering, and Mathematics). Through collaborative projects, problem-solving, and creative challenges, students can improve their social interactions and teamwork. This blog explores how educators can leverage robotic kits to enhance social skills among students.

Collaborative Projects

Robotic kits for students are ideal for group projects where students must work together to design, build, and program a robot. Assigning students to small groups fosters a sense of teamwork and shared responsibility. Each group member can take on a specific role, such as the builder, programmer, or tester. This division of labor helps students learn to rely on each other and appreciate the contributions of their peers.

(1) Example Activity: Synchronized Dance

Let’s use the VinciBot set by MatataStudio in this activity. One student program one VinciBot for the dance steps, while their partner programs the other to mirror or complement the moves. They can create a dazzling robotic duet!

Clear Instructions and Feedback

Effective communication is crucial in robotics projects. Team members should be able to explain their code, design choices, and robot functionalities in a way their peers understand. Encouraging open discussions about the project’s challenges and solutions helps students practice articulating their thoughts and ideas. Another handy tip is to assign roles based on the strengths students excel at. One student might excel at coding, while another is a whiz at solving bugs. This avoids redundancy and leverages each member’s talents.

 (2) Example Activity: MatataStudio Pro Set

The hands-on building aspect of MatataStudio Pro encourages teamwork. Set up a coding obstacle course by dividing the tasks, with one focusing on navigating a maze and the other tackling a specific obstacle. They’ll need to communicate their plans and results to ensure their robot completes the entire course. This activity not only enhances communication skills but also promotes critical thinking and problem-solving.

Inclusive Learning Environment

Robotic kits for students can be used to create an inclusive learning environment where all students feel valued and supported. Encouraging students to work with peers from diverse backgrounds and abilities helps build empathy and understanding.

 (3) Example Activity: Inclusive Learning

MatataStudio fosters inclusive learning through robot kits. Diverse teams work together on projects, with intuitive coding blocks catering to a range of abilities. Even young learners can join “Inventor Kit” projects where grade 4 students contribute ideas while older ones offer guidance, creating a supportive environment where everyone thrives.

Encouraging Problem-Solving and Critical Thinking

Robot kits often involve solving real-world problems, which requires students to think critically and work together to find solutions. These challenges foster a collaborative mindset and help them develop resilience and persistence.

 (4) Example Activity: Traffic Lights

Imagine a project where students use Matatalab to tackle a real-world challenge in their community, like traffic congestion. They could brainstorm solutions, and then design a robot using Matatalab’s theme maps (like a “city” map) and coding blocks. The robot might navigate a course representing city streets, programmed to follow traffic lights and avoid collisions (representing real-world traffic flow).

Creative Problem-Solving

Encouraging creativity in robotics projects allows students to explore different ways to solve problems and innovate. This creative process often involves group brainstorming sessions, where students learn to listen to and build upon each other’s ideas.

(5) Example Activity: Navigating through the Cave

MatataBot needs your assistance to find a safe cave for the night. A helpful parrot gave him directions, but there was a hidden mistake in the code. Use your creativity! Analyze the path and the provided (possibly flawed) code blocks. Can you spot the error and rebuild the correct sequence on the Command Board? Once you fix the “bug,” guide MatataBot through the twists and turns to reach his comfy cave.

Using robotic kits for students in K-12 schools offers a unique and engaging way to enhance social skills among students. By promoting teamwork, building empathy, encouraging problem-solving, and fostering creativity, educators can help students develop essential social skills that will benefit them throughout their lives. Integrating robotics into the curriculum not only makes learning fun and interactive but also prepares students for a future where collaboration and innovation are key.

Contact us

Fill in your details below or send us an email on info@knowledge-hub.com

Easy Force Experiments using LEGO® Education BricQ Motion Essential

Easy Force Experiments using LEGO® Education BricQ Motion Essential

The checkered flag is about to wave, the crowd is roaring, and the excitement is electric! In this thrilling LEGO® Education BricQ Motion Essential lesson plan, we’ll take you through the final leg of the engineering design process. Get ready to put your knowledge of forces and motion to the test as you build an automated cheering crowd using LEGO® bricks! Easy force experiments are designed for students in grades 3-5 and can be completed in two class sessions (around 45 minutes each) in a hybrid learning environment. It’s perfect for those who have already explored simple mechanisms, patterns in motion, and balanced and unbalanced forces in previous lessons.

Building a Cheering Crowd

Part A: Setting the Stage (45 Minutes)

Warm Up! (5 Minutes)

  1. Let’s get inspired! Begin by watching a short video (included in the student material) that captures the energy of a crowd celebrating a victory to get started with the easy force experiments.
  2. After the video, have a quick discussion with your classmates. Ask questions like:
    • How were the people moving in the video? (Jumping, waving, high-fiving!)
    • Can you connect these movements to the mechanisms we’ve learned about?
    • How can we use what we know about forces and motion to create LEGO® models that mimic these actions?

Get Ready to Cheer! (Announce the Challenge! – 5 Minutes)

  • It’s time to unleash your inner engineer! Today’s mission: design and build a mechanism (or multiple mechanisms) that creates an automated cheering crowd.

Planning Makes Perfect! (30 Minutes)

  1. Now comes the brainstorming and building phase!
    • Sketch your ideas to brainstorm on easy force experiments! Before diving into construction, take some time to plan your masterpiece. Draw out your design and think about how the different parts will connect and move.
    • Build it! Feel free to use your creations from previous lessons for inspiration, or unleash your creativity and invent something entirely new.
    • The more interconnected moving parts, the better! Encourage complexity in your designs.
    • Teamwork makes the dream work! Discuss your ideas with your classmates before building.

Part B: Refining and Celebrating (45 Minutes)

Sharing is Caring! (5 Minutes)

  1. It’s time to showcase your creations! Gather your classmates and share your plans for refining, improving, and finalizing your cheering crowd models.
  2. Feeling stuck? No problem! Brainstorm solutions together. Here are some ideas:
    • Use the building instructions for inspiration.

Bringing Your Cheer Squad to Life! (30 Minutes)

  1. Time to put the finishing touches to the models created using easy force experiments
    • You’ll have 20 minutes to complete your creation. After 15 minutes, a friendly reminder will let you know you have 5 minutes left to ensure a functional model.
    • Once your model is built, test it with a partner for 2 minutes. Did it bring the crowd to life?
    • Early finishers? Put your creativity to use by marking a start and finish line (50 inches apart) for a celebratory Minifigure race!
    • Now comes the grand finale! Gather everyone for a class-wide celebration!

Reflecting on the Race (5 Minutes)

  1. Let’s talk about your awesome creations! Explain your models to your classmates.
  2. Ask questions like:
    • How well did your model work?
    • What improvements could you make for next time?

Beyond the Finish Line (5 Minutes)

  1. Let’s wrap up with a final reflection.
    • What part of this lesson did you enjoy most?
    • What was the most challenging aspect?
    • Were there any models that particularly inspired you?

Cleaning Up and Assessment

  • Time to put everything back in order! Dismantle your models, sort the LEGO® bricks back into their trays, and tidy up your workspace.
  • Throughout the lesson, remember to ask guiding questions that encourage your students to “think aloud” and explain their thought processes when making building decisions.

How Did We Do?

There are several ways to assess your students’ understanding:

  1. Observation Checklist: Keep an eye on how well your students can explain the forces at play in their models.
  2. Self-Assessment: Have each student choose a LEGO® brick that reflects their performance:
    • Green: I can kind of explain the forces in my model.

Contact us

Fill in your details below or send us an email on info@knowledge-hub.com

The Value of EdTech Tools for the Classroom for Educators

The Value of EdTech Tools for the Classroom for Educators

EdTech tools for the classroom play an increasingly crucial role in schools today across Dubai and other regions. From interactive learning platforms to collaborative online tools, educators have a wealth of resources at their disposal to enhance student engagement and understanding. However, not all teachers feel entirely comfortable integrating technology into their classrooms. This blog post aims to empower educators of all levels by offering practical tips to become more technology-friendly and unlock the vast potential of educational technology (EdTech).

Understanding the Benefits:

The first step towards tech-friendliness is appreciating the benefits it brings to the classroom.

  • Personalized learning: Tailored online programs and applications cater to individual learning styles and paces, ensuring no student falls behind or gets bored.
  • Increased engagement: Interactive activities, simulations, and gamified learning experiences spark curiosity and make learning fun.
  • Enhanced collaboration: Online platforms foster collaboration beyond classroom walls, allowing students to work together on projects with peers across the globe.
  • Critical thinking skills: Technology empowers students to research, analyze information, and solve problems independently.
  • Improved communication: Digital tools facilitate communication between students, teachers, and parents, fostering a more connected learning community.

By embracing technology, educators can create a dynamic and engaging learning environment that caters to the needs of the 21st-century learner.

Building Your Tech Toolkit:

Now that you understand the advantages, it’s time to build your tech toolbox. Here’s how:

  • Start Slow: Don’t overwhelm yourself – begin by exploring a few user-friendly EdTech tools for the classroom like video tutorials, quizzes, educational games, and collaborative whiteboards.
  • Seek Professional Development: Many schools offer professional development opportunities focused on EdTech integration. These programs can equip you with the necessary skills and confidence to use various tools effectively.
  • Connect with Tech-Savvy Colleagues: Learn from experienced colleagues who have successfully integrated technology into their classrooms. Observe their teaching methods, ask questions, and tap into their knowledge.
  • Explore Online Resources: A plethora of online resources, tutorials, and webinars cater to educators of all tech levels. Utilize these resources to learn about new tools and various EdTech tools for the classroom.

Developing a Tech-Positive Mindset:

Embrace a mindset and treat challenges as opportunities to learn.

  • Don’t Be Afraid to Experiment: Trying new technologies can be intimidating, but remember, everyone starts somewhere. Embrace the learning process and explore different tools with an open mind.
  • Focus on Learning Outcomes: Technology should never be the sole focus of a lesson. Ensure it complements your teaching style and curriculum objectives.

Seek Help When Needed: Don’t hesitate to ask for help from tech-savvy colleagues, IT professionals, or students. Learning is a collaborative process, and everyone can contribute.

Integrating Technology Effectively:

Once you feel comfortable with basic tools, consider how to integrate them seamlessly into your lesson plans. Here are some key strategies:

  • Align Technology with Learning Goals: Technology should enhance the learning process, not replace it. Choose EdTech tools for the classroom that directly complement current curriculum objectives. Let’s take Purple Mash as an example. This platform is a treasure trove for primary schools and includes engaging activities across English, math, coding & science.
  • Plan for Technical Glitches: Technology can be unpredictable. Have a backup plan and alternative activities for contingencies such as internet outages or software malfunction.
  • Embrace Blended Learning: Technology can be used to enhance traditional classroom instruction. Consider using online resources for independent learning activities or flipped classrooms.

EdTech Tools for the Classroom:

EdTech tools for the classroom are not a replacement for a skilled educator, but a powerful tool to enhance the learning experience. By embracing a tech-positive mindset, building your tech toolkit, and integrating technology strategically, educators can create dynamic and engaging learning environments that prepare students for success in today’s world. Remember, the journey of becoming a tech-friendly educator is a continuous process of learning and exploration. Embrace the challenge, and watch your students thrive in this digital age!

Contact us

Fill in your details below or send us an email on info@knowledge-hub.com