
SPIKE™ Essential Mini Mini-Golf: A Fun Way to Explore Energy and Motion
Mini-golf is more than just a game; it’s a perfect way to explore important physics concepts like energy, motion, and speed. With the LEGO® Education SPIKE™ Essential Mini Mini-Golf lesson, students in Grades 3-5 get to build and code their own mini-golf game while learning about how an object’s energy affects its movement. This hands-on activity not only strengthens STEM skills but also fosters creativity and problem-solving. If you’re wondering how this lesson works and what students can gain from it, continue to read the Blog as we answer some of the most common questions about SPIKE™ Essential Mini Mini-Golf.
What is SPIKE™ Essential Mini Mini-Golf?
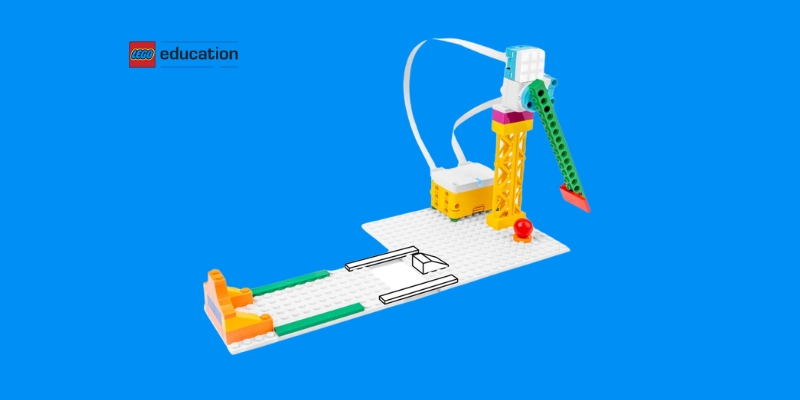
SPIKE™ Essential Mini Mini-Golf is a classroom-friendly activity designed to introduce students to the relationship between an object’s speed and energy. Using LEGO® Education SPIKE™ Essential sets, students build a mini-golf game and code it using the SPIKE™ App. The lesson encourages experimentation as students modify their designs and programs to achieve the ultimate goal.
How does the lesson start?
The lesson begins with an engaging discussion to get students thinking about energy and motion. The teacher facilitates a conversation about moving objects, such as a rolling ball or a kicked soccer ball, to help students understand how an object’s speed is linked to its energy. Students are then introduced to the story’s main characters and their challenge: making the perfect mini-golf shot. Each group is provided with a LEGO® brick set and a device to begin their hands-on exploration.
What do students do during the activity?
In small groups, students follow the SPIKE™ App’s step-by-step guidance to program a mini-golf game. They start by creating a basic program to get the ball into the hole. As they progress, they are challenged to modify their program and upgrade their game to make it more exciting. This involves tweaking the code, testing new solutions, and refining their designs to improve performance. The activity encourages trial and error, helping students develop perseverance and critical thinking skills.
How does coding fit into the lesson?
Coding plays a crucial role in this lesson, as students use block-based programming to control the motion of the mini-golf club. After completing the initial challenge, they are given Inspiration Coding Blocks to explore new possibilities for improving their game. These coding blocks spark creativity, allowing students to adjust the power and direction of their mini-golf shots. By testing different variables, they learn how programming can be used to manipulate real-world objects.
What STEM concepts do students learn?
This lesson primarily focuses on energy and motion, helping students understand how an object’s speed impacts its energy. Through hands-on experimentation, they see firsthand how different forces influence movement. Additionally, students engage in problem-solving and logical reasoning as they debug their programs. If the math extension is included, they also analyze angles and line symmetry to further develop their geometry skills.
How do students reflect on what they’ve learned?
At the end of the activity, students gather to discuss their experiences. They reflect on how their modifications affected the game and answer questions like, How did changing the program impact the ball’s energy? and, What design choices made the game more challenging? This discussion reinforces key concepts and allows students to articulate their learning in their own words.
How is student understanding assessed?
Teachers can assess students’ understanding through observation and structured self-assessment tools. Students evaluate their learning using a color-coded brick system: yellow for developing understanding, blue for confident understanding, and green for mastery with the ability to help others. Additionally, peer feedback sessions encourage students to share insights and constructive suggestions, reinforcing teamwork and collaboration.
Can this lesson be adapted for different skill levels?
Yes! The lesson includes differentiation options to accommodate various learning needs. For students who need extra support, the lesson can be simplified by focusing only on the first challenge. For those ready for a greater challenge, students can experiment with different club designs or explore additional coding blocks to see how they impact the game’s difficulty. These modifications ensure that all students are engaged and appropriately challenged.
How can math be integrated into the lesson?
Teachers who want to extend the lesson can incorporate geometry by having students analyze line symmetry and angles in their mini-golf game. Students measure and record different club angles, then draw and label geometric figures. This additional activity connects coding and engineering with math concepts, enhancing cross-disciplinary learning.
Why is this lesson beneficial for students?
The SPIKE™ Essential Mini Mini-Golf lesson is more than just a fun activity—it provides meaningful learning experiences that build essential STEM skills. Students gain a deeper understanding of physics principles while developing critical problem-solving and computational thinking abilities. The lesson’s hands-on nature makes abstract concepts tangible, ensuring engagement and retention. Furthermore, working in groups fosters teamwork, communication, and creativity, preparing students for future STEM opportunities.
SPIKE™ Essential Mini Mini-Golf transforms learning into an interactive and exciting experience. By building, coding, and testing their own mini-golf games, students develop a strong grasp of energy, motion, and programming. Whether they are adjusting the speed of the golf club or experimenting with different coding solutions, they are actively engaged in hands-on learning that makes STEM concepts come to life. If you’re looking for a way to make physics and coding more fun, this lesson is a hole-in-one!


Recent Comments