
Exploring Sound Intensity with Interactive Sound Tools like Databot™ and Vizeey™
The world of sound is a fascinating blend of physics and everyday experiences. By understanding sound intensity, we can unlock insights into how sound waves behave and impact our environment. With interactive science tools like Databot™ and the Vizeey™ app, exploring sound intensity becomes an engaging and hands-on journey, perfect for students and educators alike. This article delves into how you can experiment with sound intensity, its significance, and how to integrate hands-on learning activities with Databot™.
What is Sound Intensity?
Sound intensity refers to the loudness or strength of a sound, determined by the amplitude of the sound wave. The sound becomes louder as the amplitude increases. Sound intensity is measured in decibels (dB), a logarithmic unit that reflects how sound pressure varies. For example, normal conversations typically measure around 60 dB, while a whisper may register at 30 dB.
The decibel scale is unique because doubling the dB value doesn’t simply double the sound—it can increase the sound output by up to 100 times. This scale is essential for measuring everything from soft whispers to roaring jet engines, making it an exciting area to explore with interactive science tools like Databot™.
Tools You Need to Measure Sound Intensity
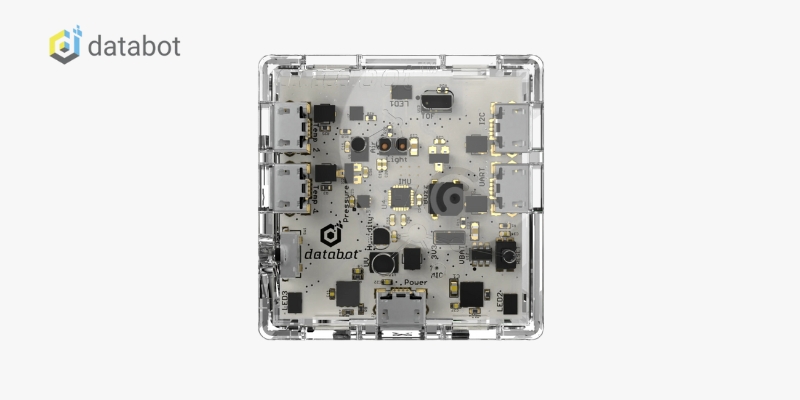
The Databot™ sound sensor is a highly precise omnidirectional MEMS microphone that converts sound waves into digital data. This sensor is commonly found in devices like smartphones and video conferencing systems, making it a versatile tool for exploring sound.
To get started, you’ll need:
- Databot™ Smart Device: A portable, sensor-packed device.
- Vizeey™ App: Available on iOS and Android, it connects to Databot™ and visualizes sound intensity data.
- Measuring Tape: Useful for experiments involving distance and sound intensity.
- A Constant Sound Source: This could be a tone generator app or a speaker.
These interactive science tools provide students with the means to analyze sound intensity in real time, turning theoretical concepts into tangible experiences.
Preparing for Sound Intensity Experiments
To obtain reliable results, place your DataBot™ in its “home position.” Hold the Databot™ flat in your palm, power and programming ports facing back. This orientation makes it easier to conduct experiments and communicate results effectively.
Using the Vizeey™ app, navigate to the “Sound Intensity” experiment and start exploring. Conduct free-form sound trials to see how varying sound intensity influences the app’s display.
Hands-On Activities to Explore Sound Intensity
Etch A Sketch with Sound: This activity combines creativity with physics. By modulating your voice, you can create shapes on the app’s graphical display. For example:
- Maintain a constant sound level to produce a flat line
- Vary the intensity to create square waves or triangular spikes
This activity allows students to visualize how sound amplitude impacts waveforms, connecting abstract concepts with interactive demonstrations using interactive science tools.
Sound Intensity vs. Distance: In this experiment, you’ll measure how sound intensity decreases with distance. Follow these steps:
- Use a constant sound source and set up a measuring tape
- Place the Databot™ at a point where the intensity reads 60 dB
- Move it to measure the distances required for 55 dB, 50 dB, and 45 dB
- Predict the distance needed for a specific intensity and test your hypothesis
Through this activity, students can grasp the inverse relationship between distance and sound intensity, a principle crucial in fields like acoustics and engineering.
Key Concepts and Terms
- Amplitude: The strength or level of sound pressure in a wave
- Decibels (dB): A unit for determining sound intensity
- Sound Intensity: Sound intensity refers to the power conveyed by sound waves per unit area.
These terms form the foundation of understanding sound behavior, making them essential for students studying physics or STEM subjects.
Connecting Standards and Learning Goals
Databot™ activities align with key educational standards, including:
- NGSS Standards: Encouraging investigation, data analysis, and modeling
- ISTE Standards: Supporting computational thinking and innovative design
- TEKS Standards: Promoting scientific reasoning and application of sound energy concepts
By incorporating interactive science tools, students gain hands-on experience that bridges the gap between learning and real-world applications, fostering both curiosity and practical understanding.
Why Explore Sound Intensity?
Sound intensity is more than just understanding loudness; it’s a gateway to exploring wave behavior, energy transfer, and environmental science. With interactive science tools like Databot™ and Vizeey™, students can dive into the world of sound with ease and excitement.
Whether drawing sound-based shapes or analyzing the relationship between distance and intensity, these activities spark curiosity and build foundational knowledge in physics and STEM.
So grab your Databot™, fire up Vizeey™, and let the exploration of sound begin!


Recent Comments